Self-Hosting#
With all the news about this company breaching trust and that company getting itself breached by hackers, some of us may feel the urge to take back some control of our data by keeping it on machines we operate and/or own. This practice is called self-hosting. Fortunately, those who want to take a deep dive will find plenty of options. This chapter will explore but a few.
This is a bonus chapter intended for advanced readers who are either very interested in the hobby elements of computing or who are thinking of becoming IT professionals and want to get their hands dirty.
Warning
By self-hosting your data you may avoid the prying eyes of companies out there, but you take on the full responsibility of protecting what you host. It’s a constantly changing world out there. New threats come up fairly regularly. It’s often safest to leave hosting important data or processes to professionals. But that’s also a lot less fun and educational.
Getting your own server#
The first step in self-hosting is to get or choose your server (or servers).
Perhaps the easiest way to do this is to pay a Virtual Private Server (VPS) company money. They’ll spin up a fresh (virtual) server in one of their data centers and give you login credentials. You can log in from your terminal and begin immediately. Companies like DigitalOcean and Linode will get you up and running in mere minutes starting around $5/month. The big companies (Amazon, Google, Microsoft) offer similar services. In this option, you’re still trusting the VPS host with your data but you’re much more unique, and there’s at least a little security in obscurity. This is a very good option for trying things out in any case.
You could get a server going in your own home. This would involve either configuring an old PC or laptop you have sitting around as a server, buying something like a Dell PowerEdge entry-level server, or cobbling one of your own together by choosing components and installing them in a case. This option is not ideal for hosting things like web pages and e-mail (your home IP address changes frequently, and many ISPs don’t allow hosting), but it can be really nice for personal things like file storage, home automation, ad-blocking, or a VPN.
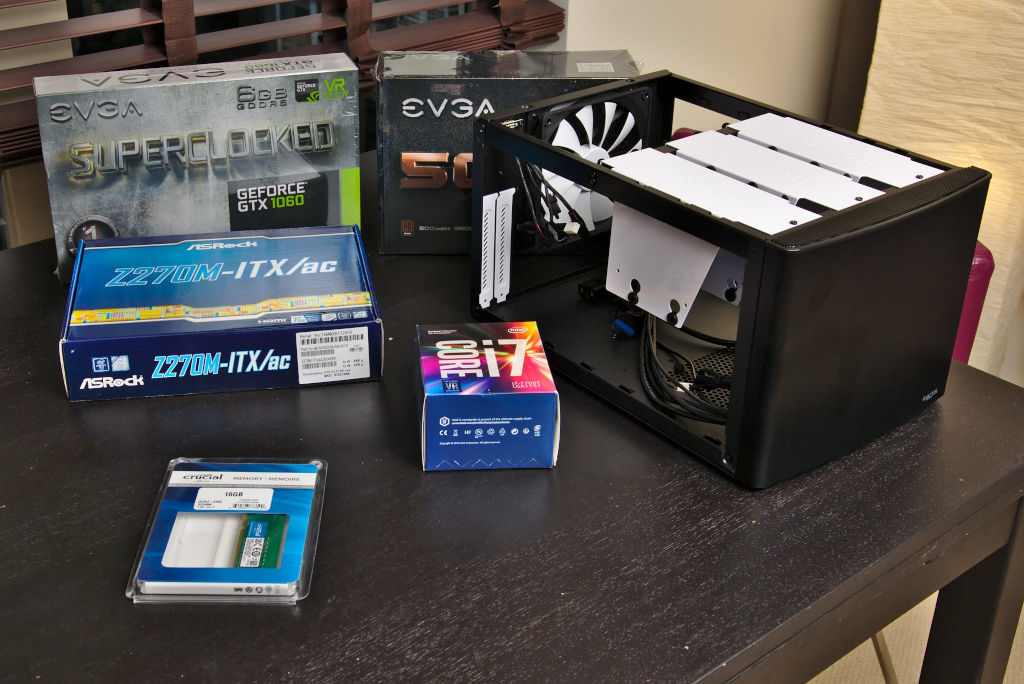
This is what it looks like to buy components of a computer (minus hard drives) before assembling it. These things effectively snap together but you should enlist the help of a friend who has done something similar before for your first time.#
You could also buy a rack-mount server and pay a data center to let you put it in there. That will give you reliable power, cooling, and networking but will be pretty expensive.
Most hard-core of all is to build your own rack and get a business internet connection from your ISP that does explicitly allow hosting. Do this if you want to start your own data center or something.
Once you have a server up and running, you have to choose which services and programs to run on it and then install/configure them.
Well-polished self-hosted catch-all#
Before mentioning the low-level self-hosting options below you should know that Nextcloud is a very good option to get started in self-hosting. It can run on your server and will provide personal cloud-based file synchronization (like Dropbox) as well as calendar and contacts. The company behind it offers Nextcloud support to businesses who want to run it on their own servers, but anyone can run a copy of it themselves on their own system, including a Raspberry Pi. Nextcloud was forked from their now-competitor, OwnCloud, which offers similar features. If you go this route, you’ll find the client programs in your package manager and can easily install them to start syncing.
Self-hosted home automation and security#
Computers can do really wonderful things around the home when hooked to various sensors and switches. Home automation is a major industry with major players. I think it’s fair to be skeptical of putting control and surveillance of our own home in the hands of other people. Additionally, if some server in Texas goes down for whatever reason, you don’t want your house to stop being smart only because it’s totally dependent on the cloud! Fortunately, the world of self-hosting for home automation is extremely advanced, active, and welcoming.
Home Assistant is an incredible open-source home automation driver system that was at one point among the top active repositories on GitHub. You can install it on a computer in your home (even on a cheap little Raspberry Pi) and have it do all kinds of things. All data stays right at home. Here are just a few examples of what you can configure it to do:
Turn your lights on at a certain time and play nice music to help you wake up
Turn lights on in the living room when you walk in
Alert you if it’s going to be extra rainy today
Advise you about your commute options
Play a Common Loon call the second the Sun sets every day
Turn your dumb furnace into a smart furnace, heating up every morning before you wake
Arm a security system when all family members’ cell phones have disconnected from the Wi-Fi network (and also at night when everyone goes to bed)
Disarm a security system when any family member reconnects to the Wi-Fi (so you never have to type a code or anything)
Trigger an alarm that turns lights on, blares a siren, and e-mails pictures to you from cameras when a door is opened or motion is sensed while armed (after a brief warning period)
Control your TV, stereo, and air conditioner as you desire (e.g. cool it down when you start your commute on hot days)
Remind you on certain days of events on your calendar, or when it’s garbage day
Provide gentle beep noises whenever any door is opened or closed when you’re home
Rig up a motion-activated jump-scare on a TV for a Halloween party
Dim the lights at night, and play some cricket noises for ambiance
Remind you randomly to do pushups
Monitor your household energy usage
Turn a closet light off 20 minutes after it’s been turned on
Turn lights on and off randomly when you’re away to confuse would-be burglars
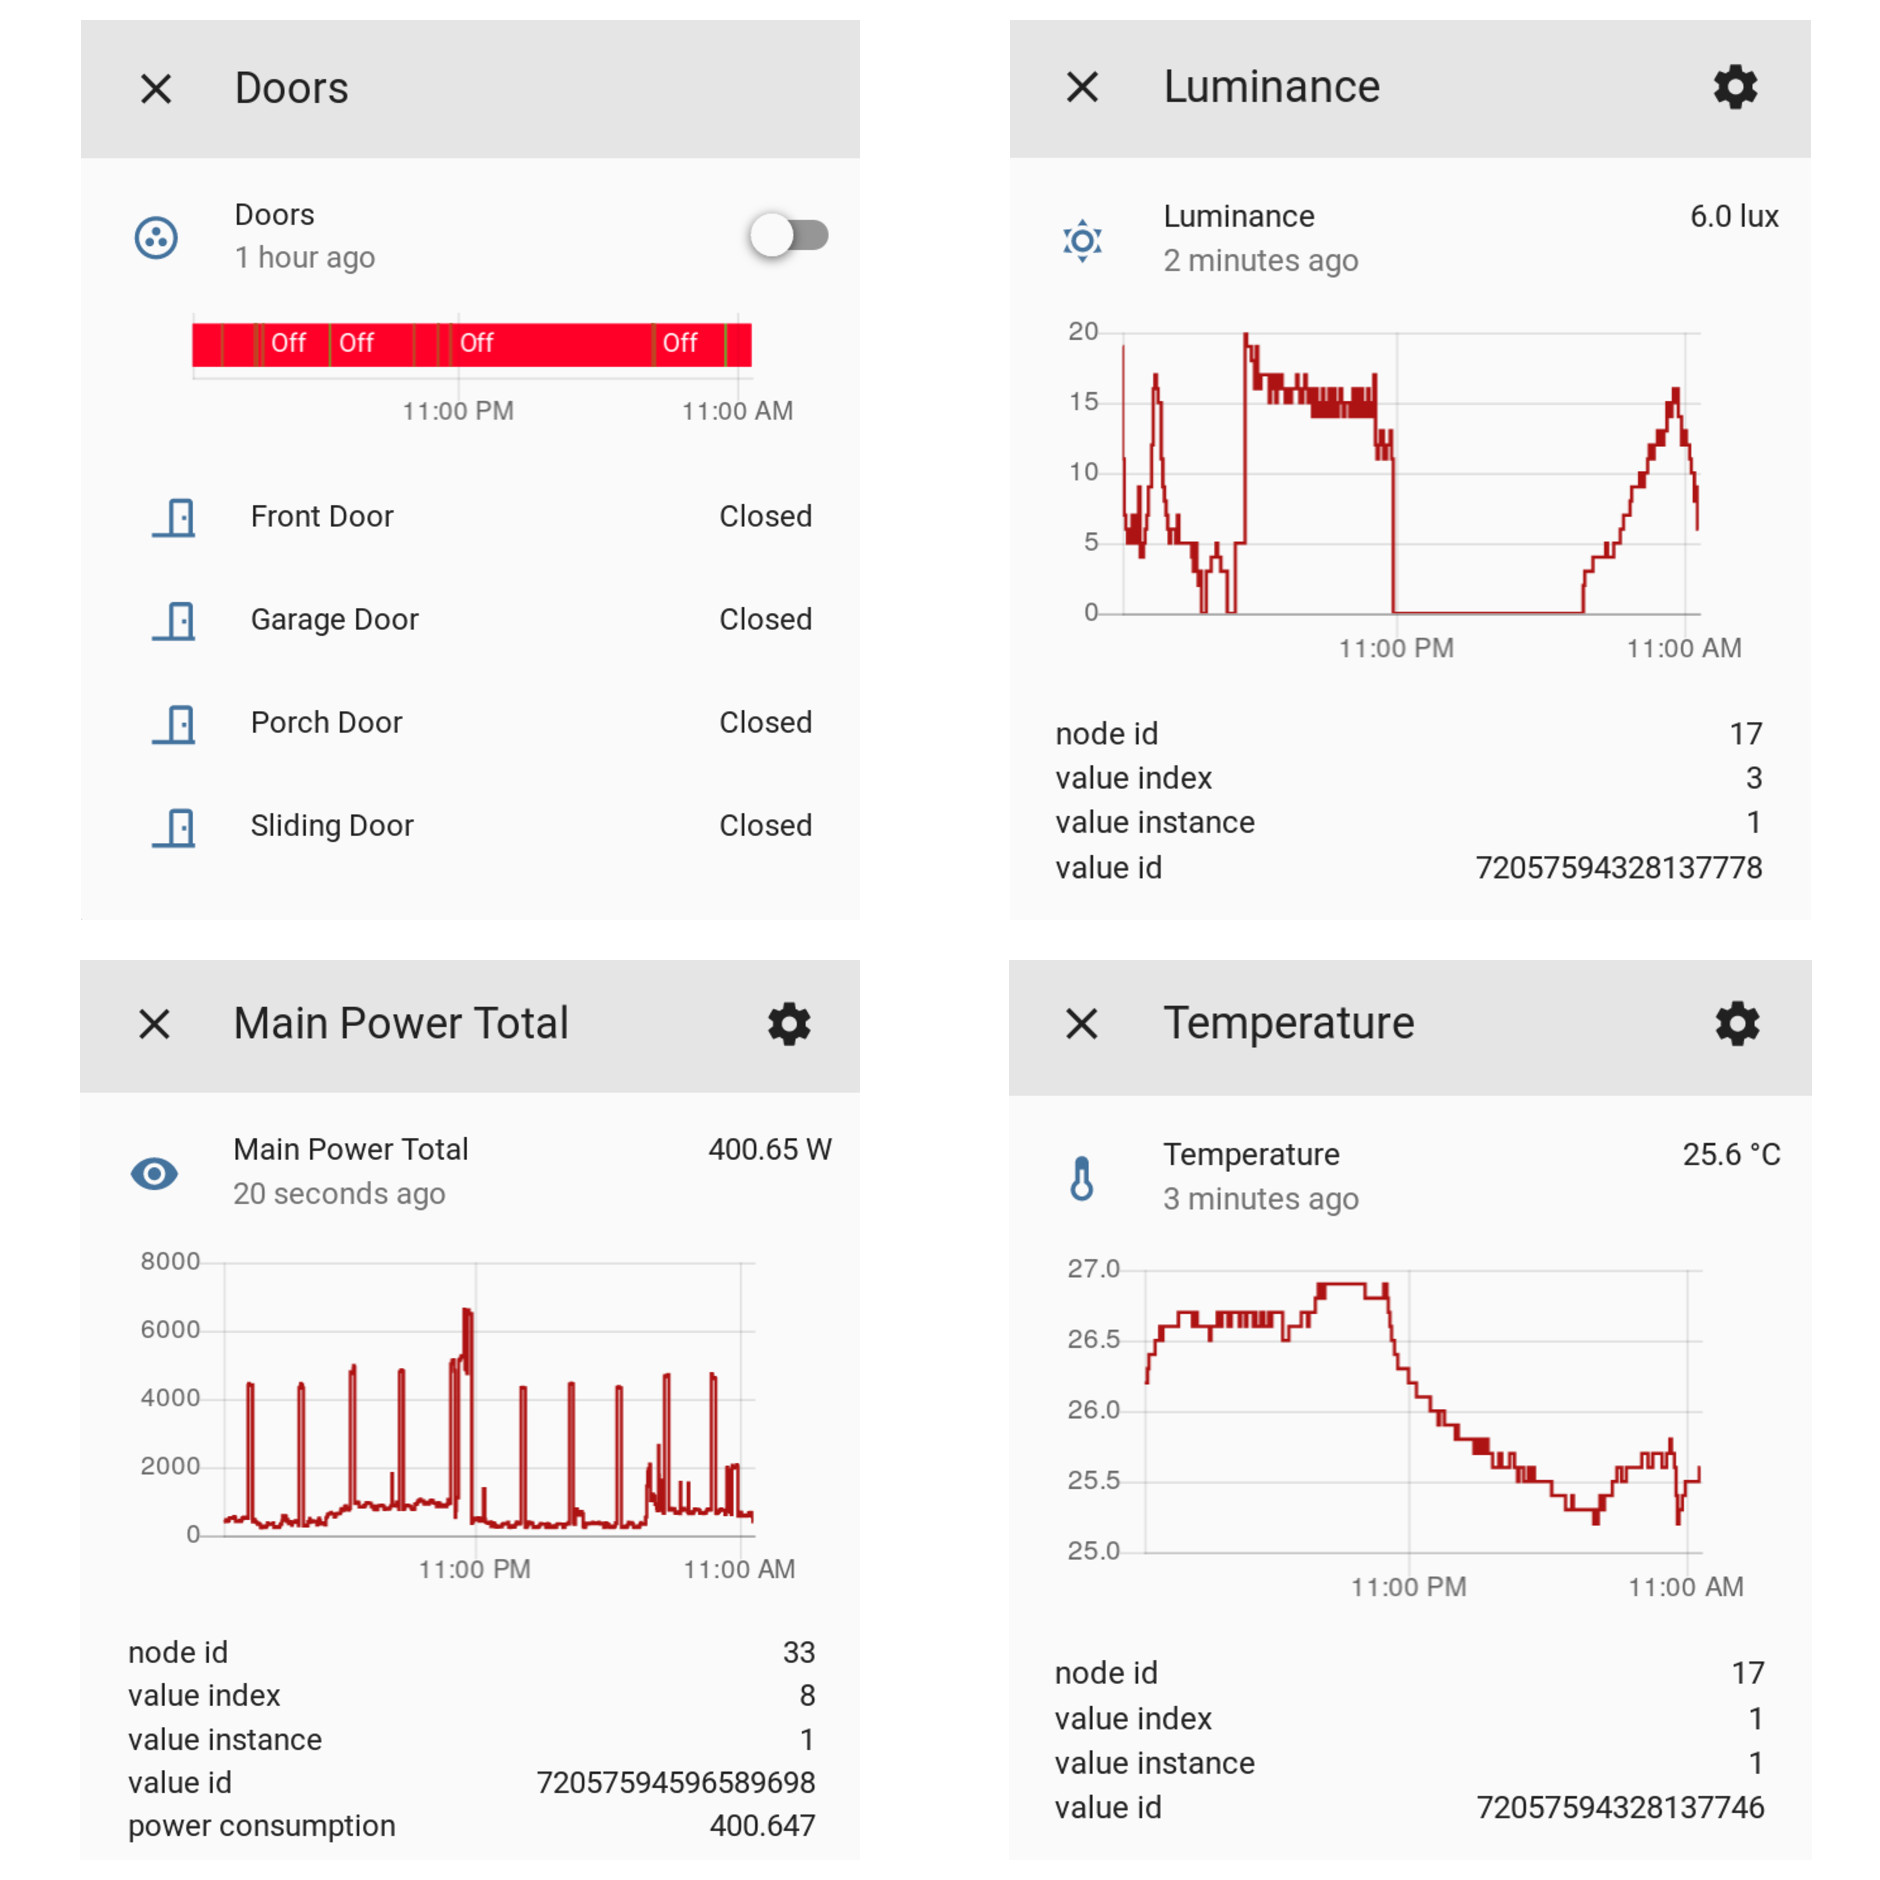
A few sensor readings from Home Assistant.#
Here are some steps to try out Home Assistant:
Get a Raspberry Pi kit including a memory card, power supply, and case. It should run you about $50. This is a full-on Linux computer, but tiny and cheap. Once you set it up, install it near a stereo and connect the audio output of the Pi to an audio input of your stereo. This will allow it to alert you of things audibly.
Get a USB Z-Wave dongle like the Aeotec Z-Stick Gen5, Z-Wave Plus USB. Z-Wave is a wireless technology not unlike Wi-Fi but on a different radio frequency. It’s designed for low-bandwidth mesh-networks, meaning a signal can reach the main access point by relaying from device to device if the access point isn’t in direct range.
Get a few Z-Wave door sensors, switches, and motion sensors (as budget allows). The easiest switches to install are basically things you plug into the wall and then plug your lamp (or whatever) into a socket it provides.
Install Home Assistant. I prefer the “Virtual Environment” installation method even though the “docker” option may be a little simpler. Set up the configuration for Z-Wave.
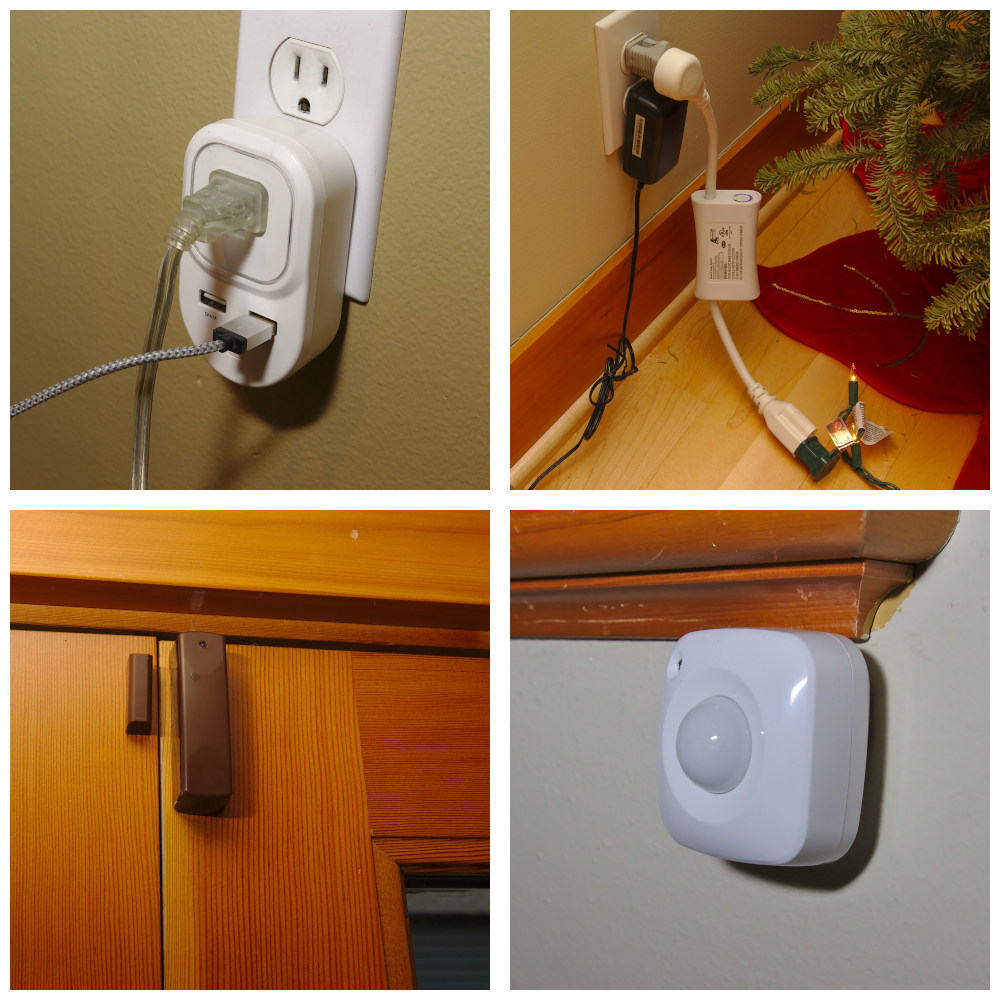
A few good Z-Wave sensors and switches. The plug-in ones are very convenient for adding smart-capabilities to normal things (like Christmas lights), and the battery-powered door and motion/temperature/humidity sensors last far longer than one might expect.#
Home Assistant uses text files in the YAML format for configuration. The best way to get
the hang of it is to look through a lot of the example configurations people have posted
online. Then, try to make your own automation. The best part about the community is that
you can ask, and they’ll really help guide you through. There’s even a chat room for help.
Here’s one that plays a little beep every time someone opens a door:
shell_command:
  door_chime: play -v 0.6 /pool/Systems/AptPi/Videos/beep.mp3

automation:
    - alias: Doorbell
      trigger:
        - platform: state
          entity_id: binary_sensor.sliding_door
          from: 'off'
          to: 'on'
        - platform: state
          entity_id: binary_sensor.front_door
          from: 'off'
          to: 'on'
        - platform: state
          entity_id: binary_sensor.garage_door
          from: 'off'
          to: 'on'
        - platform: state
          entity_id: binary_sensor.porch_door
          from: 'off'
          to: 'on'
      action:
        service: shell_command.door_chime
These structured-text input files are yet another example of the utility of pure text files.
Set up your own VPN Server#
You may have a workplace that lets you connect to their VPN to get onto the corporate network and access your files. If you’re feeling up to it, you can actually set up a personal VPN server for yourself in your home using an open source VPN system called OpenVPN. You can get all the benefits from Using a VPN Service for free while also accessing your home network from wherever you are, and quite securely! Who can you trust to not snoop on you better than yourself [1]? People who are into security cameras, home automation, and other advanced home networking would like this “road warrior” option. You can even install a VPN server on some of the more powerful home Wi-Fi routers themselves (some even come with a VPN server capability out of the box!).
Setting up a VPN server may be cheapest if you install an after-market firmware system on your home router. This isn’t particularly easy and can damage your router if you do it wrong, so I can’t recommend it unless you have a backup to fiddle with, and are willing to struggle a little while reading forums on advanced troubleshooting. The standout aftermarket router firmware is called OpenWrt. Once you install it on a supported router, setting up the VPN server functionality requires a few steps:
Generating cryptographic keys for the server and all the clients you wish to connect with (all laptops, phones, etc. you have, and maybe your friends’ too if you want to charge them).
Entering the server keys and settings into the router’s configuration (through the router web interface)
Adjusting the firewall on the router appropriately
Downloading and installing OpenVPN clients on all your laptops and phones (use the app called OpenVPN Connect)
Copying the cryptographic client keys to each device and importing them into the client
Keeping track of your home’s public IP address, typically by setting up something called Dynamic DNS
The tutorials about doing this are very long, commiserate with how complex these systems are. Although that particular one is a bit longer than it needs to be (no use of the LuCI user-interface!?). It looks like the internet as a whole is short of a great OpenVPN server tutorial at the moment. Of course, you can also install OpenVPN on any other server, including a VPS. That may honestly be the best bet for privacy, but you’ll miss out on accessing your home devices.
Your own webserver#
As discussed in Publishing, putting web pages online requires server space. Beyond
paying someone to configure and run the servers for you, you can also configure and run your
own. The apache and nginx systems are among the most popular for web servers. If
you do end up going deep with self-hosting, it’s very useful to have one of these systems
operating, even if you don’t have a public web page to host. Since these systems are the
first line of defense for the majority of the internet against attackers, they are made
with security in mind. You can hide many of the self-hosted applications discussed
here behind these efforts. Something called a reverse proxy comes in handy for this,
where you run your self-hosted application on your server, but only expose it to the
public internet through a specially-guarded pathway going through apache.
While many
self-hosted applications do come with their own web-server system, it’s a simple fact that
no matter which one it is, it’s not as widespread as apache. Thus, apache has had
more eyes on it, so when vulnerabilities are found, it gets patched very rapidly.
Hosting your own contacts and calendar#
One of the major societal advances evident when one loses a phone is that when you get a new one and sign in, your contacts and calendar often are still there. This is because they are “in the cloud” or as we learned earlier “on someone’s server somewhere”. If you have your own server, you can get the same capability without giving anyone else your info.
The internet standards governing the exchange of contact and calendar information are called CardDAV and CalDAV. Most calendar and contact apps on phones or computers will be able to interact with any server that speaks these languages. One great open-source CalDAV/CardDAV server is called Radicale. It’s written in Python and can run on any kind of machine.
It’s nearly trivial to get it up and running at home in a way that will only be accessible from your home network. However, it’s even better to have it running on the public internet so that you can update your calendar while you’re away from home. To do that requires you to configure a web server and use a reverse proxy as mentioned above. The details are out of the scope of this book, but I encourage you to look into it if it’s something you think you’re interested in. Personally, I love that kind of thing.
Personal cloud for documents and photos#
As mentioned above, Nextcloud is the easiest way to get started with your own cloud file synchronization system.
For all you advanced web server operators out there, Seafile is another excellent option. It has phone and desktop clients for all major systems, and can auto-upload photos taken on your phone.
Self-hosting your own e-mail#
No one recommends self-hosting your own e-mail anymore. In fact, most corporate IT
departments don’t even want to host e-mail; many of them are migrating to
cloud-based services maintained by a few major companies. However, for those of us who
really want to achieve the ultimate badge of honor in self-hosting (and the associated
inability to get your e-mails through to a bunch of people), just know that it is
certainly possible. Dovecot and postfix are the server components,
and spamassassin with Bayesian filtering is surprisingly effective against spam. As
you configure your server, send a test e-mail to services such as https://mail-tester.com,
which will analyse it and produce a report telling you of any server configuration issues
you still have to work out. Once you get a 10/10 score, you’re good to go.
That wraps up this bonus chapter. I hope this brief tour will inspire the brave and curious among you to investigate the fascinating world of self-hosting.
Footnotes