Around the Office#
Fluorescent lights. Cubicles. Bosses. TPS forms. Computers. Many of us dread these things even though we go into an office full of them every day and get paid to do so. I swore to myself in high-school that I’d never end up in one of those places! But when I actually got a job that involved cubicles, it wasn’t nearly as bad as I expected. One thing I didn’t realize was just how mentally big a computer can make a small cubicle. The computer is an infinite window. Inside a computer, we can make wonderful things happen. We can coordinate a project with people around the world. We have phenomenal cosmic power in an itty bitty living space [2].
But we have to make the computer our partner in crime to get into this mindset. The computer, as an extension of our brains, should be seamless and natural. This chapter shows how to make that computer at work a more valuable and cooperative life-comrade.
Note on office suites#
A lot of people spend a lot of their time in e-mail programs, presentation software, word processors, and spreadsheets. Most offices have at least a few people who are power-users of these programs and are relied upon for giving tips. The superpowers from the previous chapter should help a lot in these programs. Beyond that, skills in these tools are well-known or discoverable enough that we just aren’t going to focus on them much. In many cases, the things you’re learning here provide new options beyond your typical office suite.
Concentrating in offices#
Offices are loud. Open floor plans are making them even louder. Many victims of such an environment have already discovered how important noise-canceling headphones are (they’re worth it and can even drown out baby cries on airplanes). I still struggle sometimes because it’s often difficult for me to concentrate when music is playing. I discovered a simple solution in the form of a wonderful web page called MyNoise.net. They feature free, high-quality noise generators with different ambiances (like Café Restaurant, Rain, Temple Bells, etc.). I can concentrate fully again; they’re really a lifesaver. Best of all, they recently released an app that can do offline playback which is a godsend on airplanes.
You can also make custom white noise in Audacity, discussed below. If you’re on Linux, you also have a nice noise-generator available on the command line. You can pipe the random number generator into your speakers at various frequencies (e.g. 10 kHz) like this:
cat /dev/urandom | aplay -r 10000
Note Taking#
Organizing thoughts and notes is a time-honored challenge. People come up with all sorts of ways to take notes, ranging from using real or digital sticky notes for everything, to putting everything in one or many word processor or text files, to using fancy note taking applications. Several extremely capable note taking applications have emerged in the past few years that really do make a difference: Obsidian and Logseq. To a degree, these are based on concepts that first showed up in a commercial tool called Roam Research.
OS |
Installation method |
|---|---|
Windows |
|
Linux |
|
macOS |
|
Logseq starts with a daily journal of bullet points. You can write how your day is going.
You can put [[ and ]] characters around certain key phrases (for recurring
meetings, big projects, specific people, specific things) when you mention them, and
logseq will set up bidirectional links to them. So for instance if you mention [[Tom]]
a bunch of times, you can Shift-Click on it as a link and a side window will open
up and show all the times you ever mentioned Tom. It’s exhilarating and extremely
useful. It’s the only note taking system I’ve used daily for over a year.
Screenshots#
Oftentimes you’ll need to make a step-by-step tutorial for someone to follow on a computer
system you’re demonstrating at work. For this and other uses, screenshots, or capturing
what’s on your screen to a file or the clipboard can be useful. You can paste what’s
captured into a slide deck, document, or image editor. Generally, pressing the
Print Screen button will capture the entire screen to a file. On Windows, check out
The Snipping Tool (search for it by typing after clicking the Start button), which is
nice because it will let you lasso a rectangle over the region you’d like to snapshot. On
macOS, you just press Command-Shift-4 to get a custom rectangle to snap (it will
save to the Desktop unless you also hold Ctrl, which will send it to the
clipboard). On Linux, the lasso-clipboard is usually Shift-Print Screen.
Text editors and extensions#
Many digital superpowers we’ll soon see involve manipulating files containing only text. There’s minimalism and elegance in pure text files that puts them at the forefront of power. Text files are the universal medium upon which many digital power-tools operate. Text files are what web pages and new programs are written in (as you’ll see in Programming). Some poets and writers prefer writing in pure text to minimize distractions.
“Surprisingly” [3], many computers don’t come with overly useful programs
for viewing and manipulating text files. We’re all used to word processors but those add
special whitespace characters and formatting controls in proprietary (or at least widely
varied) formats that we want to avoid when dealing with text and data. Many computers come
with default text editors (like Notepad) that are bad at dealing with text files properly.
Fortunately, this is easy to reconcile. In Windows, an excellent option called Notepad++ can hop into your digital toolbox with a flourish via your package manager (see Programs and package managers) using:
choco install notepadplusplus
On a Mac, sublime is one of many good choices:
brew install --cask sublime-text
On Linux, the often-included editors (like gedit) are likely sufficient for what we’ll
be doing here.
Tip
For those of you who work in text a lot, whether it be for writing books,
programming, making web pages, etc., you may be interested in the next-level text
editors like vim. It’s available on all platforms and has a significant learning
curve. Most people’s first experience is rebooting their computer because they can’t
quit it (hint: use :q). But it is extraordinarily useful if you dedicate yourself to
it. It took me years, but I got to a point where I couldn’t live without it. It’s
basically an advanced magic wand. The best resource to get started is a book called
Practical Vim by Drew Neil.
We should mention file extensions too. The extension is just the filename suffix; the
stuff after the dot, like txt in myfile.txt. By convention, it determines the type
of a file, and therefore which program your computer will pass it to when you click on
it. Windows and macOS hide these extensions by default, but you can turn it them back on if you
want:
OS |
Operations |
|---|---|
Windows |
Start → Type |
Linux |
Already shown ☺ |
macOS |
Finder → Preferences → Advanced → |
In text editors, when you are creating a new file and you press Save As, the save
dialog will let you specify both a file name and a file type. If the file type
section is set to something like Text files (*.txt) and you type myfile.dat there
is a reasonable chance it will actually get written as myfile.dat.txt. So if you want
to specify a different extension (e.g. for making a .py file when making a Python
program), then first choose All files (*.*) from the file type dialog and then type
your desired extension in the file name area.
Column editing#
This superpower really blew my mind when I first experienced it. Did you know you can edit
an entire column of a text file at the same time? Well, you can, and it’s called Column
Edit or Block Editing. This can really be a time-saver in certain scenarios. For example,
the screenshot below was made by entering Column Select mode and then just typing
testing 123 OK HERE GO a single time:
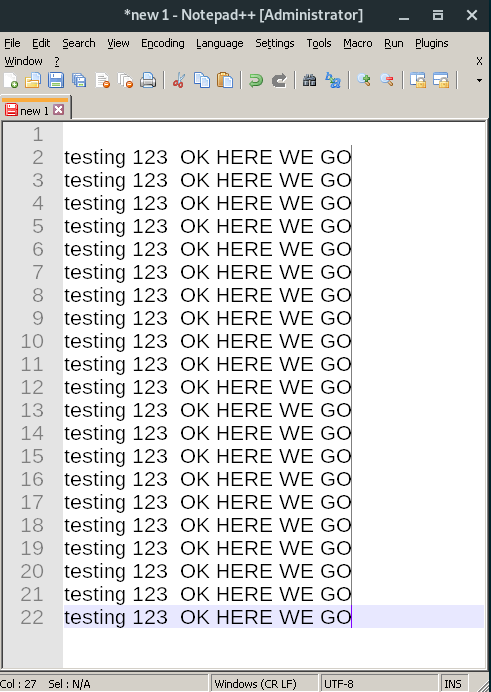
An example of Column editing in Notepad++. Note that my cursor is 21 lines tall!#
I could just as easily go in there and delete all the OKs in another easy swoop.
This is remarkably useful for rapidly manipulating columnar data.
Column editing isn’t available in every text editor, but here are a few that can do it:
Editor |
How to activate Column Edit |
|---|---|
Notepad++ |
|
Word |
Alt + |
Eclipse |
Alt-Shift-A to toggle on and off |
Vim |
From starting point, press Ctrl-v. Now use navigation to select column. Now edit (i.e. with I) and escape. |
Note
In macOS Alt is often replaced by Command.
Slicing and dicing PDFs#
Portable Document Format (PDF) files were developed in the 1990s to ensure that documents would look as intended no matter what hardware or software the viewing user was running. Before them, files even from different versions of the same program could experience unintended format changes. The format is defined by an open standard, and as a result, plenty of programs can create and view PDFs, including many well-known office tools.
The task of modifying PDFs is often reserved for Adobe Acrobat Pro. If you only need to do simple
modifications, however, you may enjoy exploring an endlessly useful utility called the PDF
toolkit, or pdftk for short. This tool will allow you to mix and match PDFs, combine
pages from different documents, remove pages, encrypt/decrypt, add watermarks, fill out
forms, and so on.
OS |
Installation method |
|---|---|
Windows |
|
Linux |
|
macOS |
Go to official download page and get Mac version |
To try it out, let’s add a cover page to a PDF. If you have a cover page called
cover.pdf and another called document.pdf and you’d like to put the cover page on
the document, pdftk can do it with its cat command (short for concatenate, which
means slap together in a certain order):
pdftk A=document.pdf B=cover.pdf cat B A output book.pdf
In that command we called document.pdf a shorter name, A, and we called the cover
B. Then we invoked the cat command and asked it to first put all of B and then
all of A into a new PDF called book.pdf. You can also make the cover go in as the
second page by specifying more complex concatenation sequence, like this:
pdftk A=document.pdf B=cover.pdf cat A1 B A2-end output book.pdf
Want to require viewers to type a password of j4j2jxk4 before they can read a PDF?
That’s just:
pdftk book.pdf output book-encrypted.pdf user_pw j4j2jxk4
Many more commands and operations are available, and you can read all about them in the pdftk manual.
Note
You’ll see a whole world of PDF creation from scratch in Publishing
While we’re looking at PDFs, you may sometimes happen up on a PDF where you can’t highlight or search through the text. Many tools can remedy the situation by scanning over the file, recognizing characters, and embedding the text into the file. My favorite utility for doing this Optical Character Recognition (OCR) is OCRmyPDF, which is a simple and powerful interface riding on top of some cutting edge OCR libraries.
OS |
Installation method |
|---|---|
Windows |
A see instructions online |
Linux |
|
macOS |
|
To use, just run:
ocrmypdf input.pdf output.pdf
The output.pdf file generated will have a OCR layer and be in the PDF/A format. I use
this all the time.
Ultimate find and replace (regular expressions)#
Brace yourself, you’re about to learn about regular expressions (REs), perhaps the most powerful but poorly-named superpower yet. REs are expressive ways to describe a pattern that you want to find and/or change. They are famous both for looking very opaque and for saving thousands upon thousands of hours of painfully tedious work while causing rapid promotions. There’s even a webcomic about REs being a superpower.
Imagine you have a thousand phone numbers formatted like so:
(509) 123-4567
But your boss is trying to be more international and has asked you to convert them all to the format:
+15091234567
You could go through one by one and do them, but that’d be tedious, inefficient, and frustrating. Worse, what if you had ten thousand to modify? You can’t use regular-old find and replace for this because each phone number is slightly different. This is exactly the kind of thing regular expression are made to handle!
REs have special symbols to match different classes of characters. For instance, \d represents any single
number. So the following regular expression matches all phone numbers in the format above:
\(\d\d\d\) \d\d\d-\d\d\d\d
We used \( and \) on the parentheses because parentheses without backslashes are
used to group things. We can use the + shortcut which means “match one or more” to
write the same RE as:
\(\d+) \d+-\d+,
which will still match the phone numbers, and would also match patterns that have 20-digit long area codes (if that were a thing for some reason). See? They look scary but aren’t that bad!
Here are some RE identifiers and their interpretations:
Character |
Interpretation |
|---|---|
|
Any digit (0-9) |
|
Any whitespace (space, tab, etc.) |
|
Any non-whitespace (letters, numbers, punctuation) |
|
One or more of previous pattern |
|
Zero or more of previous pattern |
|
Any alphanumeric character, or underscore |
|
Any single character of any kind |
|
Define a new group matching whatever pattern is inside |
If you want to match an actual plus sign or an actual parenthesis, you have to precede it
with a backslash, like \+. This gets tricky because you can have expressions with both
+ and \+ which mean totally different things (one or more vs. actual +).
Now for the superpower of RE find/replace. Let’s define 3 groups, one for the area code, one for the prefix, and another for the number by using parentheses:
\((\d+)\) (\d+)-(\d+)
All we did was put non-backslashed parentheses around each group of numbers. In doing this we defined three groups: Group 1, Group 2, and Group 3. Group 1 is the area code, Group 2 is the prefix, and Group 3 is the last four numbers.
When we’re telling a RE find/replace system what to replace our matches with, we can refer
to those groups by number using \1 for Group 1, \2 for Group 2, and so on. This allows
us to mix and match the groups and even change their order.
For our example, we want to replace each match with +1, followed by the area code
(\1), then immediately the prefix (\2) and then the rest (\3) so our replace
pattern looks like this:
+1\1\2\3
Note that we used non-backslashed + because in the replace pattern, we don’t have to worry
about the special meaning; that only matters in the match pattern.
There are lots of programs that can perform RE find/replacements for us. One simple option is to use Perl, which is available in your package managers [5]. Yes, it’s an entire programming language, but it’s pretty small, and we’re only going to use one tiny feature of it. To install, use one of these:
OS |
Installation method |
|---|---|
Windows |
|
Linux |
|
macOS |
|
The syntax we need to have perl swap one pattern for another is weird looking, but
straightforward. It starts with the program name (perl) then some options -pe
which tell it to run an in-line program and print the output, then the s/ command (for
substitute), then the MATCH PATTERN, then a / separator, then the REPLACEMENT
PATTERN, then a / to close out the replacement pattern, then a g for global (meaning
change all occurrences on a line, not just the first), and then finally the filename
to operate upon. So it’s going to substitute the match with the replacement on each line
and print the results. Explicitly:
perl -pe 's/MATCH PATTERN/REPLACEMENT PATTERN/g' filename
Let’s try it out. Make a file called input.txt in a folder
somewhere:
(509) 123-4567
(123) 555-4567
(000) 509-1234
(555) 551-0000
Now run this command in your command line (filling in MATCH PATTERN and REPLACEMENT
PATTERN from above):
perl -pe 's/\((\d+)\) (\d+)-(\d+)/+1\1\2\3/g' input.txt
This should produce the following output:
+15091234567
+11235554567
+10005091234
+15555510000
Wow! To further illustrate, let’s leave the match pattern the same and make a more complex replacement pattern, changing the order of the groups and everything:
perl -pe 's/\((\d+)\) (\d+)-(\d+)/Prefix: \2 Num: \3 Area: \1/g' input.txt
This gives:
Prefix: 123 Num: 4567 Area: 509
Prefix: 555 Num: 4567 Area: 123
Prefix: 509 Num: 1234 Area: 000
Prefix: 551 Num: 0000 Area: 555
Tip
If you want to create a new file with that output, redirect it to a file by adding the following to the end of the command:
> output.txt
This is a fairly universal way to save command line output as a file rather than printing it on the screen.
Or even better, if you want to find and replace inside the file itself, use the
in-place option of perl with perl -i -pe followed by the rest of the replacement
command.
Let’s do one more example with something other than just numbers. Imagine your input looks as follows:
Dr. Michelle Obama
Dr. Newt Gingrich
Dr. Peter Pan
Dr. Jane Eyre
Dr. Winston Churchill
Dr. Herodotus Johnson
Further imagine that we want to get rid of the Dr., add Mc to their last name, and add
M.D., Ph.D. at the end. The grouped match pattern would be:
(Dr\.) (\w+) (\w+)
The replacement would be:
\2 Mc\3, M.D. Ph.D.
Notice that we never referred to Group 1 in the replacement, so the Dr. will be dropped
entirely. See if you can figure out the command required to get this output:
Michelle McObama, M.D. Ph.D.
Newt McGingrich, M.D. Ph.D.
Peter McPan, M.D. Ph.D.
Jane McEyre, M.D. Ph.D.
Winston McChurchill, M.D. Ph.D.
Herodotus McJohnson, M.D. Ph.D.
Now that’s a superpower!
If you prefer to not use the command line for this, things like Notepad++ can do these kinds of operations with graphics. Even MS Word has some RE capabilities these days. Check out RegExOne for a great resource to interactively learn more RE syntax.
Tip
Useful related searches to explore:
regex find replace **program name**regular expression to match e-mail address
Encrypted communications#
We talked about how to keep the bits on your hard drive safe in File Encryption and how to browse the web with encryption in The Onion Router and the dark web, so now let’s talk about how to securely communicate directly with our friends and business associates over networks.
Encrypted text messaging, photos, and voice#
For text messaging and encrypted voice calling over the internet, there’s really no good reason to not use Open Whisper System’s Signal app on your phone and computer. This is an open-source, user-friendly app (with a Desktop version) that does it all without any complications. The encrypted voice sound quality is far superior to normal, and the messaging is very straightforward. If that doesn’t convince you, it was made by a dreadlocked anarchist hacker sailor named Moxie Marlinspike and is funded through privacy-oriented donations to its foundation. There is no profit motive to this organization to snoop on you or build a profile of you. Also, Edward Snowden uses it. Go to https://signal.org/download/ to get it on any phone or computer. I like having it on my computer for longer text conversations because I can type faster there.
How to send, receive, and verify info securely over the public internet#
We’ve all needed to send some confidential document to our associate in Ecuador, but we often don’t trust anyone between here and there. How do we do it? Basic e-mail is a no-go because e-mails bounce around from server to server between users and can easily be intercepted. If we had arranged a shared password in advance, we could have used it to hide the document, at least once, but we didn’t (though Signal could help with this).
Your computer has the ability to use an incredible technology called public-key cryptography to solve this problem. It’s useful in everyday business between contractors, suppliers, employees, friends, and lovers.
Each individual in an asymmetric cryptography system needs two mathematically-related digital keys (actually they’re just large numbers) that can be used to encrypt, decrypt, and sign messages. One will be held secret, and is called the private key. The other is called the public key, and is widely distributed in the open to everyone we want to be able to send secure messages to use or verify that we sent messages they receive from us. Together, they’re called a key pair.
The details behind this math have a fairly straightforward analogy. If you think of a lock on a box, the public key turns the lock one way, and the private key turns it the other way. So if my colleague puts a document in the box and locks it with my public key, the only possible way anyone can get the document back out is to have my private key, and the only one who has it is me.
As it turns out, we all have immediate and full access to this wonderful and powerful technology. An open-source implementation has emerged as the GNU Privacy Guard (GnuPG). Its most commonly-cited inadequacy is “Poor understanding by the public”. The situation is such that people in regulated industries are buying super-expensive secure portals to transfer e-mails and files between business partners. All for want of a good user interface. No longer! [4]
Let’s drop down into the command line and see how easy it really is to send someone a truly secret message. There are GUI tools for this too, but the command line is fun, powerful, and easy.
First, install GnuPG:
OS |
Installation method |
|---|---|
Windows |
|
Linux |
|
macOS |
|
Now we can do some cryptography.
Generating your own private/public key pair#
Run the following command to generate a cryptographic key pair:
gpg --gen-key
You will encounter a series of prompts that you should fill in with your name and e-mail
address. When it prompts you with Change (N)ame, (E)mail, or (O)kay/(Q)uit?, choose
O if all looks good and press Enter. Now it will ask for a password that you’ll
need to type every time you access your Private key. If all goes well, there will be a
short delay while it generates good random numbers, and you should see text along these
lines:
gpg: key 999B22A1FD07D5CD marked as ultimately trusted
gpg: revocation certificate stored as '/home/nick/1FD07D5CD.rev'
public and secret key created and signed.

pub   rsa3072 2018-12-26 [SC] [expires: 2020-12-25]
      7C32B1F5C7124D4D5607EC04999B22A1FD07D5CD
uid    Nicholas William Touran <encryption-demo@digitalsuperpowers.com>
sub   rsa3072 2018-12-26 [E] [expires: 2020-12-25]
You’re doing some pretty fancy computer work now!
Encrypting a file#
Make or choose a file to try encrypting. I’ll make a little text file called
secret.txt:
all my secrets are in this file.
Secret 1
Secret 2
To encrypt it, run the encryption command with the armor option (to put it in a nice
format) and the recipient option (-r), filling in your e-mail address followed by
the file name we wish to encrypt:
gpg --encrypt --armor -r encryption-demo@digitalsuperpowers.com secret.txt
Note
As is typical on the command line, you can type gpg --help to see a list of
available commands and short descriptions.
In the same folder, you’ll now see a file called secret.txt.asc which will look
something like this:
A very strongly encrypted message that really beats the heck out of Pig Latin.#
If you encrypted that with one of your friend’s or co-worker’s public keys, you would not be able to decrypt it; only they could (that’s why public-key encryption is also called asymmetric). But in this case, you sent it to yourself so you should be able to decrypt it with your private key.
Decrypting a file encrypted against your public key#
You can decrypt any file encrypted against your public key with your private key. If in the previous step you entered your own e-mail as the recipient then you can try this out:
gpg --decrypt secret.txt.asc
It will prompt you for the password you made while generating your key pair. If you enter it correctly, you will see something like:
gpg: encrypted with 3072-bit RSA key, ID 477C7591734F478E, created 2018-12-26
      "Nicholas William Touran <encryption-demo@digitalsuperpowers.com>"
all my secrets are in this file.
Secret 1
Secret 2
It’s working! If you want to make a decrypted file rather than just printing to the screen
(useful for any non-text file like a zip or pdf), just add the -o output_name
option right after the --decrypt flag.
Exchanging public keys with friends#
For this to be useful we have to make sure our friends know our public keys so they can encrypt stuff to us, and vice-versa. To write your public key to a file, run (with your e-mail, not mine):
gpg --export --armor -o myname-publickey.asc encryption-demo@digitalsuperpowers.com
Now e-mail the myname-publickey.asc to your friends. When you receive a key from a
friend called friendsname-publickey.asc you can import it into your system by
running:
gpg --import friendsname-publickey.asc
Easy! Once you have your public key, spread it widely. You can even put it on your Facebook profile in the Contact Information section.
Exercise
Convince a friend also generate a key pair and have them send you their public key (e-mail is reasonable to start). Import their key and encrypt a message to them. See if they can receive it. Have them send you one back.
Warning
You have to make sure your friend’s public key is the one you got. Check the fingerprint that’s printed out upon import and verify it over another channel (like Signal!) or in person. Once you trust that the public key you got is indeed from your friend, the rest of the system should be rock solid. Don’t forget to keep your private key private too.
Signing information with our keys#
This technology also enables the incredible operation of electronically signing documents such that anyone with your public key can verify that you signed it and that it hasn’t been modified since. This is much more powerful than just slapping a scan of your physical signature on the bottom of a document; that’s easy to forge by everyone who works at a restaurant where you signed the receipt before, and offers almost no protection against people modifying the document after you signed it.
The one-way key analogy from above works here too, as long as you can imagine that the locked box has two locked positions and one unlocked position between them (i.e. it’s locked in the 9 o’clock and 3 o’clock positions, but unlocked in the 12 o’clock position). To sign a document, I’d put it in the box and then lock it to the 3 o’clock position with my private key (which can only turn the lock clockwise). Anyone and everyone with my public key can open it, thus proving that it was indeed I who put the document in the box.
Let’s try signing a document. Make a new document and call it declaration.txt:
I hereby declare that Little Johnny is sick
with fever and needs the day off. The fact
that there's a spelling test today is merely a
coincidence.
Sign it with the following command:
gpg --detach-sign --armor declaration.txt
You will have to type your password to unlock your private key. If you have more than one private
key, you can choose one with the -u encryption-demo@digitalsuperpowers.com command (with your
e-mail address, of course). Now you’ll find a file called declaration.txt.asc alongside the
original file. This is the signature! Send it along with the file to your contacts or associates, or
post it online. Given the file, the signature, and your public key, anyone (including yourself) can
verify the signature on the receiving end. Here’s how:
gpg --verify declaration.txt.asc
You should see a message indicating success that looks like:
gpg: assuming signed data in 'declaration.txt'
gpg: Signature made Fri 11 Jan 2019 06:42:32 PM EST
gpg:                using RSA key 7C32B1F5C7124D4D5607EC04999B22A1FD07D5CD
gpg:                issuer "encryption-demo@digitalsuperpowers.com"
gpg: Good signature from "Nicholas William Touran <encryption-demo@digitalsuperpowers.com>" [ultimate]
Exercise
Try modifying the declaration.txt after signing it and see what the verification step does.
Encrypting with GUIs#
Admittedly, not everything is best in the command line. There are ways to integrate this into e-mail. For instance, the e-mail client, Thunderbird, works great with any kind of e-mail account and has built-in support of GPG encryption. Since most people are using web-based mail, it’s also worth highlighting FlowCrypt, which is a Chrome extension that puts these features on top of a Gmail account. Some people electronically sign all their outgoing e-mail for good measure automatically with these tools.
For drag-and-drop file encryption/decryption that you can then e-mail around without any special extension, Windows users can look at the GUIs that come with Gpg4win, and other OS users will find similar tools for their system with brief web searches.
Note
Estonia actually went all-in on this kind of thing and put cryptographic key pairs on their national IDs. They had a hiccup in that the system used to generate the keys was weak and then it was hard to replace them, but I think they’re absolutely on the right track. This kind of thing can make our lives more efficient and secure in many ways. Our social security numbers are significantly weaker than those Estonian keys. If people learn about these capabilities and realize that they can use them right away on their computers, I hope we can improve process efficiencies and security. Data is important and it’s important for us to become more comfortable with encryption.
Making flowcharts#
Flowcharts come in handy for communicating process as well as mind-mapping complex
situations. Three open-source tools capable of making good flowcharts are Graphviz, MermaidJS, and dia. Graphviz and Mermaid are unique in that the nodes
and connections are expressed in text, and the system generates the actual flowchart. This
is favorable when you aren’t interested in the precise layout of the flowchart (it’s
determined algorithmically). It can be useful for making charts by hand, but especially
shines for data manipulators who need to generate flowcharts dynamically, based on some
data set or user interaction.
Here is what a graphviz flowchart looks like:
![digraph fig {
// First we'll define a few nodes
Start [shape=circle,style=filled,color=green]; // single node
node [shape=box]; graphviz, dia, Profit; // node list
decision [shape=diamond,style=filled,color=lightgrey, label="Point and\n click?"];
// Then we define the connections
Start -> decision;
decision -> dia [label="Yes"];
decision -> graphviz [label="No"];
{dia, graphviz} -> Profit;
}](_images/graphviz-ecf1f576bc8a4c46e811d3cf2b5b9993e93b9b40.png)
Choosing a flowchart#
The source to make that flowchart is:
digraph fig {
  // First we'll define a few nodes
  Start [shape=circle,style=filled,color=green];  // single node
  node [shape=box]; graphviz, dia, Profit;        // node list
  decision [shape=diamond,style=filled,color=lightgrey, label="Point and\n click?"];

  // Then we define the connections
  Start -> decision;
  decision -> dia [label="Yes"];
  decision -> graphviz [label="No"];
  {dia, graphviz} -> Profit;
}
To do such a thing, you first install graphviz:
OS |
Installation method |
|---|---|
Windows |
|
Linux |
|
macOS |
|
and then build the flowchart with a command like this:
dot -Tpng flowchart.dot > flowchart.png
(Hey! There’s that output redirection that we saw earlier. Don’t forget it or else you’ll
see what a text representation of a binary png image file looks like.)
The downside is that it’s hard to get the flowchart looking just how you want it.
That’s where dia comes in, allowing you to just draw out your own in detail.
If you do want to use declarative text to create flowcharts with precise layouts, the more
advanced library that can do this is called Tikz.
The GNU utilities#
An exceedingly useful set of small, free utilities is often packaged together as The GNU utilities. A few of them are obscure but absolutely worth trying out.
OS |
Installation method |
|---|---|
Windows |
|
Linux |
|
macOS |
|
Unit conversion#
Perhaps my favorite utility here is units, which converts units from one system to
another. It can be run interactively or with one-offs. Let’s show it interactively first.
Type units and press Enter. Type 10 cups at the prompt and press Enter.
Then type tablespoons and press Enter again. Behold! It tells you that there are
160 tablespoons in 10 cups:
You have: 10 cups
You want: tablespoons
    * 160
    / 0.00625
You have:
That’s not even getting started. Press Control-C to quit. Now let’s try it in
one-liner mode. You just say units "what you have" what you want. For the previous
example, that’d be:
units "10 cups" tablespoons
This thing has over 3000 units in it. Here are some more to try:
units "2 dozen feet" metersgives7.3152units "2 bakersdozen feet" metersgives7.9248units "2 dozen bakersdozen feet" metersgives95.0976units "1.7 meters" "feet;in"gives5 feet + 6.9291339 in(Woah! It split those out!)units "tempC(32)" tempFgives89.6[1]units "1 googol femtobarns" "teraparsecs^2"gives, astoundingly,1.050265(that’s an obscure nuclear unit of area converted to square astronomical units of distance made famous by the Millennium Falcon’s Kessel Run)
Read more about it at https://www.gnu.org/software/units/
Pattern matching with grep#
The grep utility gets a regular expression and then prints it.
This is endlessly useful when dealing with large datasets, especially when chained
together with other utilities. For the next few examples let’s assume we’re maintaining a
website for our company and it involves a deeply nested folder structure with thousands
upon thousands of text files in it (HTML, CSS, etc.). At the bottom of each page is a
footer that says something like Copyright © 2025 My Company, LLC. Say we want to just
find and print all of those for any year. We can use grep with the -R(ecursive)
and -P(erl mode) options to do this:
$ grep -RP 'Copyright © \d\d\d\d My Company' *.html
And you’ll see:
Copyright © 2025 My Company, LLC
Copyright © 2025 My Company, LLC
Copyright © 2024 My Company, LLC
Copyright © 2023 My Company, LLC
...
Extracting a column with awk#
The last command printed out every line. But what if we only want to grab the year out
of that because we’re going to put it in a spreadsheet and do something with it. The
awk tool can be chained to grep to process each line that grep prints. There’s
a whole world of awk commands, but one to know is the print command, which can
print the first, second, third, or nth column in an output stream. In the example above,
the year is the third column (space-delimited) so we would use this (| can be typed
with Shift - \):
$ grep -RP 'Copyright' *.html | awk '{ print $3 }'
Giving:
2025
2025
2024
2023
Tip
Throw a | clip on the end of that last command and the results will be in
your system clipboard. Now you can paste into another program, like a spreadsheet.
Multi-file find/replace#
You’ve seen how we can find matches in multiple files and even down-select things in the
lines we want to see. Earlier, you saw how to do RE find/replace with perl. For the
grand slam, we need to find and replace in all those files. In our example, we will
update all © years to 2026. Here’s the command if all the files were in one directory:
perl -i -pe 's/Copyright © \d\d\d\d/Copyright © 2026/g' *.html
When files are in multiple directories, we can chain commands together. First, we’ll find
all the files we want to cover in all directories, then we’ll send each one to the above
perl command to do the actual in-place modifications. In the command-line philosophy
alluded to in The command line, having small tools that can be chained
together is the best way to provide power, simplicity/maintainability, and flexibility.
Here, we will use the find command to find all files recursively that match a pattern,
then we’ll use the xargs command to translate that list of files into input for the
perl find/replace command.
We need the names of all the files in our scope. In this example, it’s any .html
file in this or any child folders. To list those, we can use the GNU find command:
find . -iregex '.+\.html'
Try it out and you’ll see all html files in a folder (put some there if you need to build
this example up). That command is looking in the current folder (called .) for any
files matching the regular expression listed, which, as you learned above, is anything
ending in .html.
Warning
On Windows, a built-in find command will conflict with
the GNU one we are using here, so you may have to type the full path, like:
C:\GnuWin\bin\find.exe . -iregex '.+\.html'
To pass the results of the find command on to another command, we use xargs as
follows (first we’ll just re-print the file names):
find . -iregex '.+\.html' | xargs echo 'Found files: '
As you can see, all files found have been passed as one long chain of arguments to the
echo command. Now we can substitute our perl command in and let the magic
happen:
find . -iregex ".+\.html" | xargs perl -i -pe "s/Copyright © \d\d\d\d/Copyright © 2026/g"
Behold: You now have the multi-file, multi-directory, regular-expression find and replace
superpower! Remember, with great power comes great responsibility. Consider testing out a
sweeping command like this (here by leaving out the -i in-place argument) before
actually changing all the files.
Footnotes